FAQs
- How to reset customer password for Fronius GEN24
When your Fronius GEN24 inverter has been installed, you'll have a customer password provided at install. Sometimes if there is an issue or you have forgotten the password provided, you might need to re-set it. That's ok and this guide will help you re-set your Customer password.
If you've forgotten the password for the local user interface of the inverter, click on "Forgot password?" to generate a PIN for the relevant user role ("Customer" or "Technician"). This PIN can be used to create a recovery key, allowing you to reset the respective password.
To reset the "Customer" password for a GEN24 inverter, log in to your system on Fronius Solar.web using the generated PIN. Navigate to "Settings" --> "Components," and click on "Actions" for the data source linked to the inverter. Use the "Reset Customer Password" function to generate a recovery key for your new "Customer" password. Please note that only the owner of the Solar.web system can access the "Reset Customer Password" function.
If you don’t see this function, it indicates that you are not set as the system owner. In this case, please contact your system installer. The "Technician" password can only be reset through a recovery key created by Fronius Tech Support.
Resetting the "Technician" password is restricted to trained specialist personnel (electrician, system installer, or Fronius System Partner). To reset the "Technician" password, contact your system installer.
Please note that the recovery key is only valid while the corresponding PIN is displayed on the inverter's user interface after clicking "Forgot password?". If the inverter is restarted or if the recovery key is entered incorrectly five times, a new PIN will be generated. In such cases, a new recovery key must also be created.
Here's a quick How-to video to Reset GEN24/Tauro Customer Password via Solar.web
- Is my rooftop solar system covered by warranty?
Yes it certainly is. Each panel type typically gets a 25 year performance warranty and at least a 10 year manufacturing warranty, depending on the panel chosen. Jinko panels offer a 10 year manufacturing warranty, QCells panels 12 years, and SunPower panels offer a 25 year manufacturing warranty (parts and labour).
Check out your panel and inverter warranty sheets for more details!
- Is my solar system covered by my home and contents insurance?
The short answer is yes, your solar system will be covered by your home and contents insurance however your premium might increase. It is recommended that you contact your insurer and discuss the impact of your solar system on your home and contents insurance with them. Note some insurance companies can provide additional insurance cover if your solar PV system is damaged or malfunctions in some way.
- Connecting Fronius GEN24 Inverter to Wifi - Fastest Method
Need help setting up WiFi for your Fronius GEN24 Inverter to your Fronius Solar.web monitoring? This method is if you have a WPS button on your modem. The WPS method is the fastest, we have a separate FAQ page to re-connect your WiFi if you don't have a WPS button in a separate FAQ explainer.
Have you recently changed your WiFi network's password, WiFi modem, internet service provider or shifted to NBN?
If so, you will need to update your WiFi password settings otherwise you will not be able to view your Fronius solar PV system online in the Fronius Solar.web monitoring portal and might recieve an email to your registered Fronius Solar.web accounts reporting fault 996 - communication error between inverter and Solar.web.
Below are steps for how to set up / change your WiFi details.
Step 1 - Activate WPS on your Modem/Router
- Go to your Modem/Router and locate the WPS button which is typically on the back of the modem/router
- Click and hold the "WPS" button for approximately 3 seconds
Step 2 - Activate WPS on the Fronius GEN24 Inverter
- Go to the Fronius GEN24 Inverter, if the WiFi is not connected, you should see solid Red, objective is get this solid Blue.
- Once in front of the inverter you'll see a Finger icon in the middle which is an Optical Sensor. Place your finger over the Optical Sensor and give two slow taps over the Optical Sensor (not too quickly). Place over and remove (first time), place over and remove (second time). If done correctly the WiFi indicator will start flashing GREEN which indicates the Inverter is trying to connect to your WiFi internet
- Wait up to 30 seconds, it will turn solid Red for a few seconds and then it will turn solid Blue. Once solid Blue, your inverter should be connected to the internet
Step 3 - Check your Solar.web monitoring account to confirm monitoring is working
- Go back to solarweb.com to your Fronius PV system and you should see that your monitoring is back up and running
- Solar PV Ground Isolation Fault
How does an solar panel ground fault, insulation fault occur and how do you resolve it?
Where there is a lot of moisture in the area (typically humid conditions or a rainy day), this is when you would notice an isolation fault. Identifying when a fault occurs is only possible when the isolation error presents. Typically you will notice the isolation fault in the morning which sometimes disappears as soon as the moisture resolves (can be a few minutes, few hours). In some cases, it is difficult to identify what has caused the isolation fault. Typically it is due to either poor quality panels or a poor quality solar PV rooftop installation.
This means the solar inverter error isn’t actually broken, or usually, it isn’t the solar inverter failing.
How does an isolation fault occur?
If the shielding on the wiring is damaged during fitting, a short circuit may occur in the DC area of the solar PV system. This is what we call an isolation fault. Besides a problem with the cable shielding, an isolation fault could also be caused by moisture or a bad connection in the solar panel’s junction box.
The error message that appears on the inverter screen is “isolation error” or “isolation fault”. For safety reasons, as long as this fault exists, the inverter will not convert any power as there may be life-threatening current on the conductive parts of the system.
How to resolve if it continues to repeat?
A licensed electrician is required to check the system to try and find the cause of the fault. If the fault can't be located (e.g. multiple sources), then new solar PV panel system and installation is most likely the ultimate solution.
- More details on the rooftop solar warranty cover?
Generally, most mechanical defects will be covered during the warranty period, as long as they are deemed a manufacturing fault. Most suppliers also guarantee 80% power production for the first 25 years of your solar power system’s life.
It is important to understand that warranty terms and conditions vary from supplier to supplier.
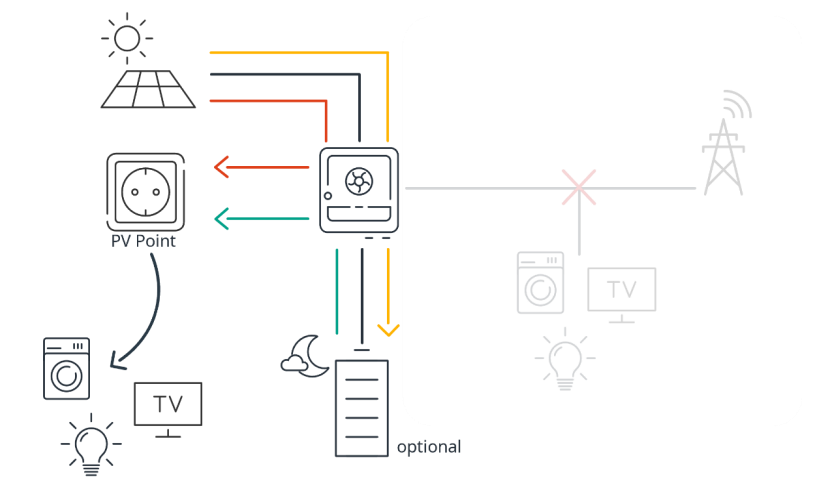
- What is the Fronius PV Point?
If you purchase a Fronius GEN24 inverter, you have the ability to get installed a "PV Point".
The Fronius PV Point is a basic backup power supply integrated into the Fronius GEN24 & GEN24 Plus series inverters. This innovative function makes it possible to reliably supply a socket or small consumer circuits with energy in the event of a power failure. PV Point provides up to 3 kW of continuous single-phase power, making it ideal for maintaining the power supply to important consumers or household appliances.
Key features include:
Function: It provides power to a designated socket (up to 3kW) during a grid outage, using available PV or battery power. Automatic Switching: The inverter automatically switches to backup power, without needing additional components.
Installation: It requires a modification to the inverter's base shell, with predefined outputs for easy installation.
Limitations: Some appliances with high starting currents (e.g., refrigerators) may not function properly. It cannot be used as an uninterruptible power supply for sensitive equipment like computers.A decisive advantage of PV Point is its simple installation and low installation costs. Unlike some other backup power solutions, PV Point does not require any additional switching components in the switch cabinet.
Another significant advantage of PV Point is its independence from batteries, provided that sufficient energy is generated by the PV modules. This means PV Point can operate in backup power mode without relying on a battery. This provides a cost-effective solution for maintaining the power supply if you already have a PV system installed. Of course, PV Point also works optimally in combination with a battery.
- How to reconnect Wi-Fi for my SolarEdge Inverter?
Your SolarEdge inverter may have disconnected from the internet - for example a change in the modem/router, change in ISP provider, etc.
To update the Wi-Fi settings on your SolarEdge inverter - follow these steps:
- Download the 'MySolarEdge' app > Android and Apple iPhone
- Log-in with your username and password
- Select 'Inverter communication'.
- Select 'Configure'.
- Select 'Connect with WPS' or choose your home network from the available networks.
- Type your password, then select 'Join'.
- How to set "Night Mode" for Solar PV System with Fronius SnapINverter?
For your solar PV monitoring - Fronius SnapINverter - you can utilise the "Night Mode" setting if you would like to observe your load data when the solar PV system is turned off overnight.
Go to the Fronius inverter and do the following:
+ Step 1: Push the Left/Right button until you see "SETUP" (the symbol looks like a spanner cross with a screwdriver) and press ENTER (physical button furthest to the right)
+ Step 2: Scroll down until you see, "Display Settings", press ENTER
+ Step 3: Scroll once down again to, "Night Mode", press ENTER
+ Step 4: Click the + or - buttons to switch the "Night Mode" setup parameter to "ON", press ENTER
And now you should see your overnight usage will be displayed in your Fronius Solar.web account.
- What is the firmware changelog on my Fronius Primo SnapINverter?
Firmware Changelog for the Fronius Primo 3.0-1-M - 8.2-1-M
Firmware Version New Features Bugfixes Set up changes 35020 - Optimization to avoid erroneous triggering of State 443.
- Fixed buzzing noise generated by power stage set.
- Inverter update fails due to the file size of the previous version (fro34310.upd). Fixed only after applying this version. Repeated update attempts may be necessary.
- New country setup for New Caledonia - NC22 (NC2022).
- Microgrid MG50 & MG60 - inner maximum frequency limit values have been increased from 52.8 Hz to 53.1 Hz.
- Country setups EULV & EUMV adapted due to EN50549-1 & EN50549-2.
- Czech CZ country setups - harmonized and adapted due to EN50549-1.
- New country setups for Lithuania - LT0A (<10kVA) and LT0B (>= 10 kVA).
34310 - Fixed false trippings of State 443.
- Optimization of power reference value for CEI-021.
- Fixed false trippings of state codes 301, 308, 317, and 479.
- New parameters for medium voltage limits for setups BRA2, BRA3, BRA5 and BRA6.
- Adjustment of GVDPR parameters for setups IT6, IT6B, IT7, IT7B.
- Adjustment of parameters for GFDPR - start frequency and underfrequency.
- Setup AUC - ReAcPoMo Characteristics Q to U10 now correctly set to 100 % .
33500 - Due to a normative requirement in Brazil (INMETRO) a software change was needed:
- Countrysetup change for all Brazil Setups
- Change P(f) – over frequency behaviour
33450 - Setup ESOS
- FRT Current Calc Mode changed from 3 to 1
- Setups IT6 und IT7
- Activation of GVDPR Mode
- Setup NI99
- FRT Current Calc Mode changed from 3 to 2
- New Brasilien Setups:
- Setup BRA2 for 220V / <6KW due to new Inmetro
- Setup BRA3 for 220V / >6KW due to new Inmetro
- Setup BRA5 for 240V / <6KW due to new Inmetro
- Setup BRA6 for 240V / >6KW due to new Inmetro
33350 - Dynamic power reduction using the S0-meter (without datamanager)
- There are two new parameters in the BASIC menue – Input Signal – Mode of Operation – S0-Meter
- "Grid power limit“ and "Impuls rate“
- Fixed sporadic, inexplicable power limitations in combination with country setup Switzerland
- Setups EU LV and EU MV adapted to the new standard 50549-1/-2
- Frequency limit adapted
- Setup atapted at DKA1, DKA2
- Anti islanding feature deactivated
- Setup changes at FROS
- Inner frequency limit changed from 64Hz to 46Hz
- Setup changes at MG50 and MG60
- Feature „Irradiation Ramp“ activated (Flicker improvements)
- Setup change AU B