-
Sanden Eco Hot Water Tank Size Options? Which tank size should I choose?
The Sanden Eco Plus hot heat pump hot water system is available in the following five sizes with our sizing guide below:
Tank size/shape Tank Code System No. of People No. of Bathrooms Dwelling type Off-peak & Continuous tariffs? Tank Diameter (mm) Tank Height (mm) 160L SS SAN-160SAQA GAUS-160FQTS 1 1 Bedsits Continuous only 621 970 250L SS
SAN-250SAQA GAUS-250FQTD 1-3 1-2 Residential Both 621 1428 250L SS Tall Slim SAN-250SAQD GAUS-250FQTD 1-3 1-2 Residential Both 580 1635 300L SS Tall Slim SAN-300SAQA GAUS-300FQTS 2-6 1-3 Residential Both 580 1891 300L SS Tall Slim SAN-300SAQD GAUS-300FQTD 2-6 1-3 Residential Both 580 1905 315L SS SAN-315SAQA GAUS-315FQTS 2-6 1-3 Residential Both 621 1748 315L SS Tall Slim SAN-315SAQD GAUS-315FQTD 2-6 1-3 Residential Both 580 2000 315L VE SAN-315VE GAUS-315FQTV 2-6 1-3 Residential Both 638 1626 *SS = Stainless Steel // VE = Vitreous Enamel
The same Sanden Heat Pump condenser unit is used in combination with different tanks sizes. So which tank size you would like?
When considering tank sizes - we need to consider a few factors - number of people, number of bathrooms, the heat recovery rate.
If you're using an existing hot water system for comparison - here are some comments/thoughts:
If you have an existing gas storage hot water system (e.g. 130L / 170L) - these are much smaller in capacity but they will reheat several times a day. Therefore the Sanden tank size will be larger than an existing gas storage replacement with the Sanden re-heat typically only required once per day - a good opportunity to maximise rooftop solar PV production or to utilise an off peak tariff.
If you have an existing electric storage hot water system (e.g. 400L 3.6kW unit) - these electric storage 3.6kW units recover heat at a slower rate (60L/hr) compared to a Sanden heat pump (approx. 80L/hr). Therefore a 400L electric storage hot water system would equate to a 300L/315L Sanden system in this example.
Based on our years providing the Sanden Eco heat pump hot water system - here are our tank recommendations for different scenarios (SS - Stainless Steel // VE - Vitreous Enamel):
160L SS: Only recommended for 1 person bedsits. This tank size is rarely chosen and due to its small tank size must be run in Continuous only mode (no blockout timer can be set up).
250L SS: Typically 1-3 person household with 1 bathroom. Height just under 1.5m with tank diameter 621mm.
250L SS Tall Slim: Typically 1-3 person household with 1 bathroom. Height just under 1.635m with tank diameter 580mm.
300L SS: The Tall Slim - the most popular and best recommended tank choice. Recommended for 2-6 people. Tank diameter 580mm and tank height just under 1.9m. If no height restrictions apply, this is the recommended tank for majority of situations and considered best value for money across the tank sizes.
315L SS: The largest tank size with an additional 15L delivered hot water (5% more) compared to the 300L Tall Slim tank. Tank diameter 621mm with tank height 1.74m - this is recommended if the 300L tall slim tank is too tall for your application.
315L SS Tall Slim: The largest tank size with an additional 15L delivered hot water (5% more) compared to the 300L. Tank diameter 580mm with tank height 2m - this is recommended if you're a very high hot water user.
315L VE: Tank diameter 638mm with tank height 1.63m with 315L delivered hot water. This VE tank is specified for poor water quality areas - you can identify if you are in a poor water quality area via the Sanden website -> https://www.sanden-hot-water.com.au/check-water-quality/
-
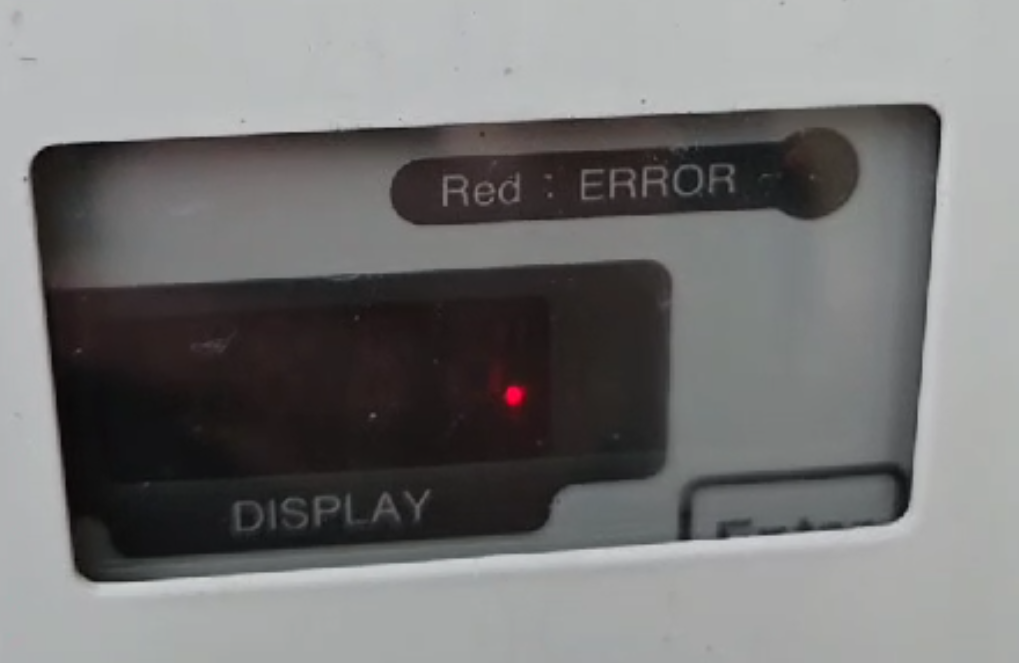
There is a red LED flashing on the Sanden heat pump display panel should I be worried?
The flashing red dot (LED) indicates the Sanden heat pump unit is currently in 'sleep mode', it is perfectly normal and nothing to worry about.
We consider this the "Sanden Heart Beat". If you see a red flashing dot, the heart is beating and all is well for your Sanden heat pump.
This controller display with the red flashing dot is applicable to the following Sanden heat pump models:
Sanden G3 - "GS3-45HPA-AU"
Sanden G4 - "GAU-A45HPC"
Sanden G5 - "GAU-A45HPD"

-
Uploading Photos for Sanden Eco Heat Pump Quote
Uploading Photos for Sanden Eco Heat Pump Quote
As heat pump hot water systems receive Government subsidies and rebates, Government authorities are requiring all photos are GEO-tagged to comply.
If you are unsure that your photos are GEO-tagged, we have a helpful Geo-tag guide on our website here -> https://pure-electric.com.au/resources/geo-tagging-helpful-guide
You can test if your photos are GEO-tagged by uploading photos to this website -> https://tool.geoimgr.com/
Please see below some photo tip examples for uploading photos to your Sanden Eco heat pump quote request.
Existing Hot Water System (Left)
Photo Tips: 2-3m to the left of the tank and up to the eaves
Existing Hot Water System (Right)
Photo Tips: 2-3m to the right of the tank and up to the eaves
Existing Hot Water System (Serial Number)
Photo Tips: Clear and readable
Switchboard
Photo Tips: Clear and readable so if you zoom in you can see the circuit breaker rating, enclosure flaps are open
Meterbox (Outline)
Photo Tips: Meterbox Door Open
Old Tank Details (Example filled in:)
Old Tank Make: Rheem
Old Tank Model: 315T136G
Old Tank Serial: 33633XXXX
Old Tank Date: 15/03/2006
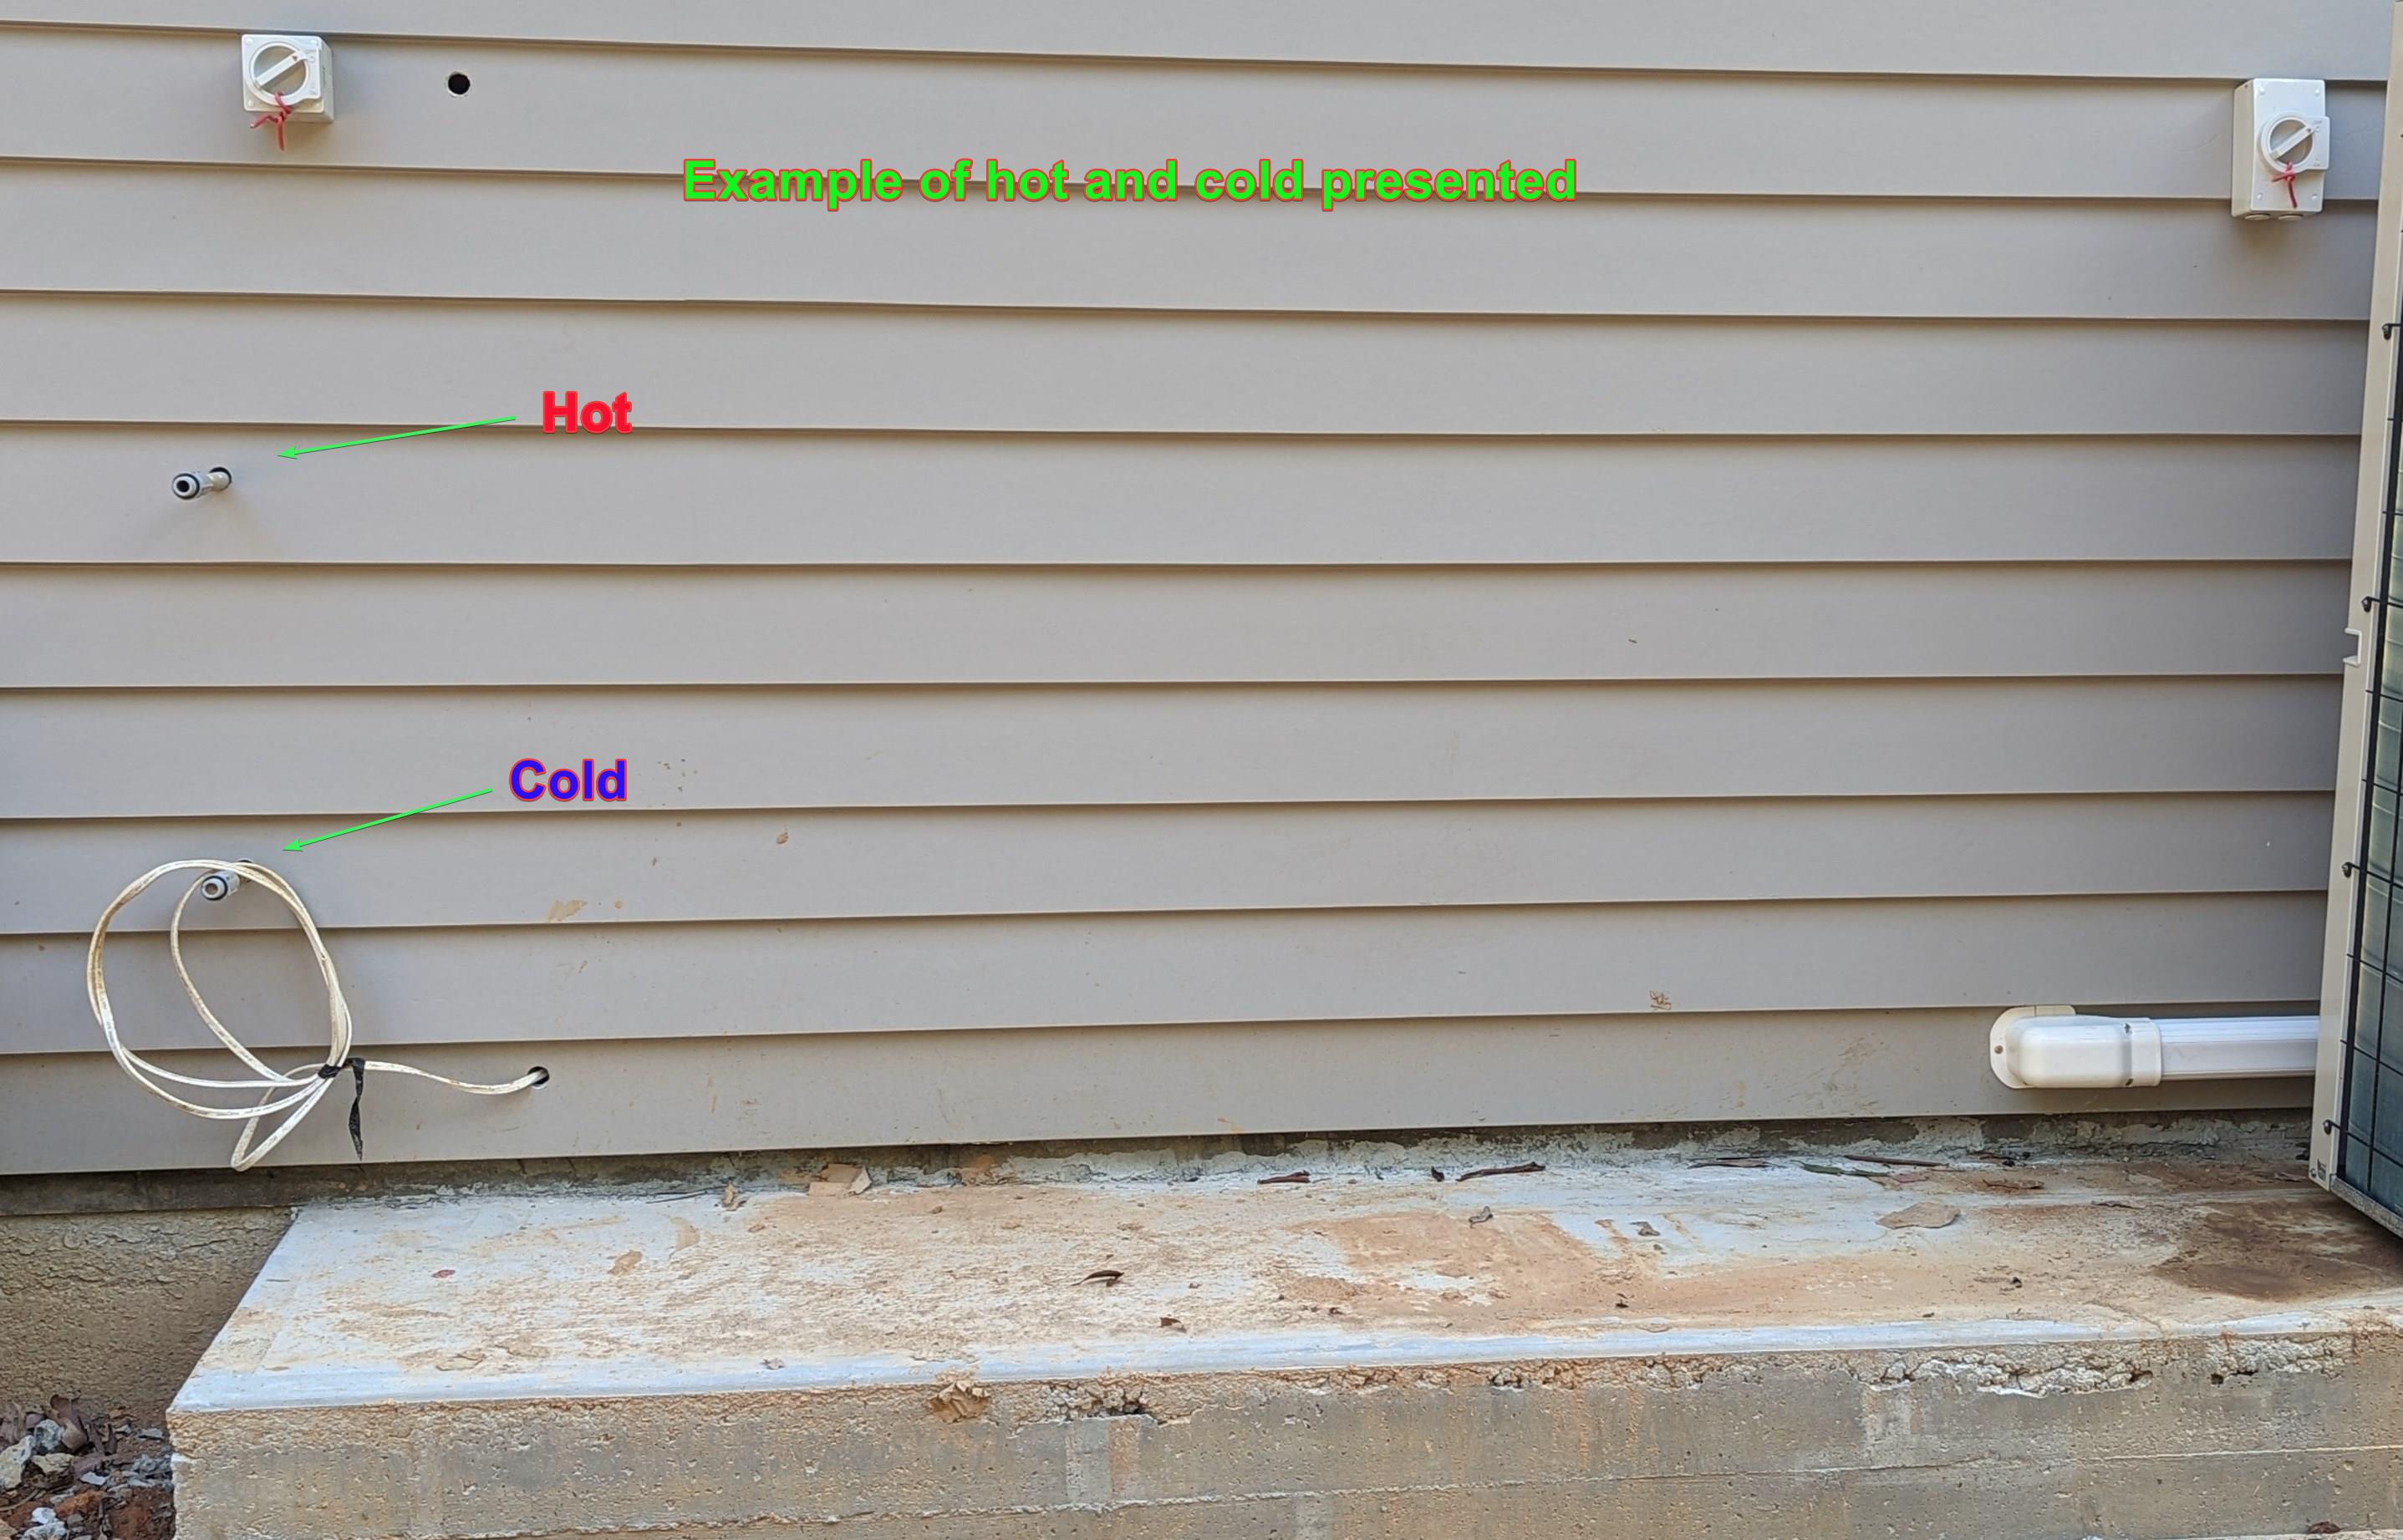
If you have a renovation with a new hot water system location, please share a photo that confirms both hot and cold connections are presented:

-
At what temperatures will the Sanden Eco® Plus heat pump hot water system operate effectively?
The Sanden Eco Plus heat pump hot water (HPHW) system will operate effectively between - 10 º C and + 43 ° C, without the need for an electric booster element. It is also fitted with built in freeze protection, making it suitable for all climates.
-
What is the life expectancy of the Sanden Eco® Plus heat pump hot water system?
The Sanden Eco Plus heat pump hot water (HPHW) system is designed to last for 15 years. The high quality, weather resistant Eco® Plus HWHP outdoor module carries a 6 year warranty and the extra-long life stainless steel storage tank carries a class leading, 15 year warranty.
-
Does the Sanden Eco® heat pump hot water system require the assistance of an electric booster element to heat water, when outside ambient temperatures are very low?
No, unlike other competitor heat pump hot water (HPHW) systems, the Sanden Eco® HPHW system does not require an electric booster element
-
Should I get the official Sanden Quick Connection kit 15mm or 20mm?
The Sanden Quick Connection Kit includes the tempering valve, ECV (Expansion Cold Water Valve), elbows, insulation gloves for all the elbows and valves so you have the most efficient set up - you can't buy the insulation gloves separately. Makes the plumbing install much quicker (plumber only needs to source copper + lagging for the copper). Always highly recommended to ensure the Sanden is installed to specifications
Normally a house with upto 2 bedrooms is 15mm and 3+ is 20mm.
-
What are RECs and STCs, what are they worth? And how many do you get with your Sanden?
What are STCs and how many do you get with your Sanden?
The purchase and installation of a Sanden Eco® Plus Hot Water Heat Pump entitles you to Small-scale Technology Certificates (STCs) – formerly known as Renewable Energy Certificates (RECs). For more information: visit www.environment.gov.au/climate-change and www.cleanenergyregulator.gov.au
The Sanden HWHP achieves the highest level of STCs of any hot water heat pump, currently available in Australia, and these are as below:
To find out which zone your postcode is in click here (note this may change so if in doubt contact the clean energy regulator for more information)
The Table below shows how many STCs are available for each Sanden model in each STC Zone
How much are STCs worth?
STCs can be priced through the Government's STC clearing house or on the open market at places like Green Energy Markets.
So say you bought a Sanden GAUS-250FQS and you lived in zone 4 and the current STC price was $35
The total discount you would receive would be: 34 STCs x $35 = $1,190.
So you would receive a discount of $1,190 off the total price of your Sanden unit (note this is an example only to illustrate how STCs are calculated the actual discount will vary depending on the current STC price).
-
Sanden Wi-Fi Controller Reset
You have a Sanden Wi-Fi controller with model Wi-Fi-HPD for your Sanden Eco Heat Pump Model GAU-A45HPD and you're finding you can't add the Wi-Fi controller when tapping "Add Device"? Read on below.
Some symptoms reported by clients are:
- Wi-Fi Controller shows connectivity, but cannot change settings
- Heat Pump Status remains on Standby
- Wi-Fi status lights are correct but cannot find the Wi-Fi controller when tapping “Add Device”.
Actions:
- Check that Communication setting mode, C_SE is set to onHP on internal, Smart Controller
- Remove front cover of Wi-Fi controller, using a Phillips head screwdriver.
NB: Do not use a screw gun / drill as you will overtighten the screws when re-installing

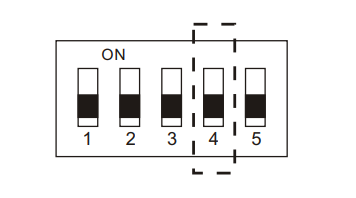
- Identify “SW1” and flick the 4th switch position to the opposite side. (You do not need to flick it back).
- LED display will be Red/Blue/Red
- Open the Smart Life App and tap “+” top right corner,then tap “Add Device”:
- App will search for devices, displays the Heat Pump under the “Discovering devices” heading. Tap “Add”.
- Enter Wi-Fi Uername and Password, then tap “Next”
- App will confirm device being added, then tap “Done”.
- LED display will be Red/Blue/Green
You can also check out our page PDF page here which includes screenshots -> https://pure-electric.com.au/resources/sanden-wi-fi-controller-reset-wi-fi
-
Sanden Heat Pump Hot Water Not Working
If you believe your Sanden Eco Heat Pump is not producing hot water, please try the following:
- Unless there is water pouring (not dripping) out of the unit, do not turn the unit off and on until you've checked the clock / control panel for an error message (under our "Resources" section you can find the different error code pages to help you determine what an error code looks like). If water is pouring out then turn the unit off at the isolator and at the switchboard that circuit is attached to.
- Pull the PTR Valve on the Tank - this confirms if there is hot water in the tank. If unsure about the water temperature use a thermometer. If water is cold goto (2) If there is 50C or so hot water in the tank then the problem is not the heat pump system) the problem is on the house side of the tank. So the tempering valve needs to be checked for a blockage / choke, if it is installed upside down or if it has failed (they are consumable items with a lifespan of 5-6 years and they fail to safe when they fail meaning cold water).
- Check the electricity supply - Confirm/check both (1) circuit breaker at the switchboard is ON + (2) Isolator at the HP unit is ON
- If you see a little Red Dot in the bottom right corner, then the HP unit has power connected. For the older G2 model 2010-2016 the dot is on the controller hidden under the lid - you will need a screwdriver to remove the 4 screws from the each end of the lid.
- Check if there are any Error Codes at the clock/computer control panel. If an error code is present, take note of the Error Code. Turn off the HP at the isolator (wait 1 minute) and turn on the HP again to see if the Error Code re-appears. The unit is functioning correctly if it blows cold air for more than 30minutes. NOTE: The unit takes about 7 minutes to start blowing cold air after power is applied.
- If system is newly installed or new plumbing works have occurred on site confirm that the tempering safety valve (valve with orange/yellow cap) is installed the right way up with a H on the vertical barrel above the adjustable valve and a C below the adjustable valve. If the system is more than 5 years old please note these valves officially only have a minimum life span of 5 years and may need replacing.
- Air bleed the system - Open the water drain plugs on the right hand side of the HP unit (one at a time for a good 3 minutes PER drain plug, ONE at a time). G4 units have an additional bleed port on the underside of the heat pump - please only turn this 180 degrees approx when opening it up - bleed this for 3 minutes also. Re-set the HP unit at the Isolator.
- Hard re-set the HP unit controller:
- Switch off power to the HP
- With power switched off press and hold down both “Up” and “Down” keys on the control panel simultaneously
- With the keys still pressed switch on power to the unit, the display will show “FClr” .... wait 10 seconds.
- To complete the reset cycle power to the unit off (wait 1 minute) and then on again.
- With power back on the time will be displayed (if required adjust to correct time) and the unit will run it's start up procedure.
- When switching power on again, the country setting "1.AU" may appear on the display. If for any reasons this setting remains on the display, simply press "Enter" and the Control Panel to confirm and HP will continue the start-up process.
- Physical inspection of the HP
- Turn off the electrical isolator, to allow power to discharge, wait 5 minutes after the power is turned off
- Take the top panel off by unscrewing the 4x screws
- Check to see if any debris/foreign objects are the top of the unit
- If an onsite plumber or electrician has a volt meter check for ~230VAC at the terminals on the side of the unit.
- If you have an older G2 unit and E124 is displaying then the unit has been subject to either high grid voltages or has suffered a power spike. Adding a timer to the switchboard and keeping the unit powered off for more than 19 hours per day can clear the fault for each and every use. This is successful in 50% of cases however works better where it is done the first time the error is ever seen. Not where the unit has been turned on and off many times.
- If you are getting E040 on an older G2 unit then you can clean the filter via the filter housing at the bottom of the unit adjacent the air bleed drain plugs. This may get you up and running again temporarily while you book a service. BOOK YOUR SERVICE OPTION HERE
- For blockages in newer units a 3 way ball valve can be installed which allows the consumer to perform their own reverse flush of the system. This maintenance step is normally part of a 4 year service can then be done annually just before the air bleed is performed.
info@pure-electric.com.au
1300 86 78 73


