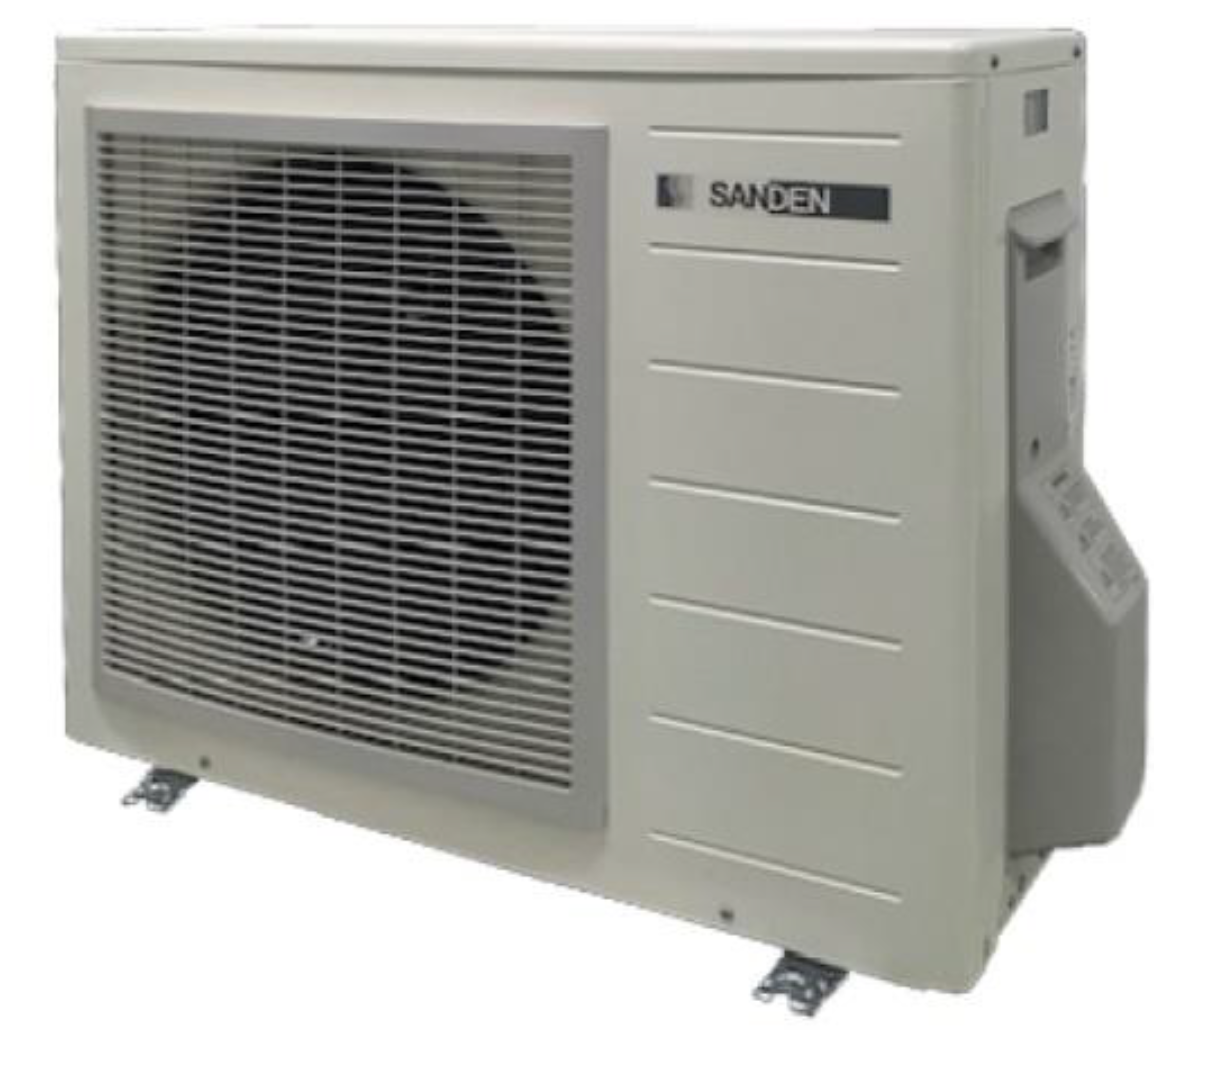
Sanden Heat Pump G4 GAU-A45HPC
GET A FREE QUOTE
QUICK REVIEW
Sanden Heat Pump G4
Model: GAU-A45HPC
In combination with the following systems:
GAUS-160FQS, GAUS-250FQS, GAUS-300FQS, GAUS-315FQS, GAUS-315FQV
Superceded by the Sanden "G5" GAU-A45HPD in 2022
- High efficiency CO2 refrigerant heat pump
- Whisper quiet operation
- High quality, Japanese made
- Unique design operates in all climates
- No backup element required
- A high Coefficient of Performance (COP=5.96^) results in significantly reduced energy use and CO2 emissions.
- Up to 50% faster heat recovery than typical heat pumps. In ambient air of 20 ºC it takes approx 4 hours to heat 315 L of water from 17 ºC to 63 ºC.
- Uses unique Ozone friendly R744 (CO2) refrigerant.
- Simple installation by Plumber & Electrician, with no Refrigeration Mechanic required.
- An automatic heating cycle, which makes it perfect for use with Off-Peak tariff.
- Uniquely designed to operate in all climates (ie. -10 ºC to +42 ºC operating range).
- Includes Blockout Timer, for use with on-roof photo voltaic (PV) solar electricity systems.
- No backup element required.
- Whisper quiet operation, with industry leading noise level of 37 dB - very neighbour friendly!
- High quality, Japanese made weather resistant construction for outdoor location.
- 6 year Warranty
Testimonials
What they are saying about us
F.A.Q
Frequently Asked Questions
-
Error Codes for Sanden Heat Pump G4 GAU-A45HPC
The HP will display an error code if it is unable to function normally.
Error codes are indicated by a red LED on the control panel. The control panel is visible via a small window at the right side of the heat pump and it can be accessed by removing the heat pump top cover (4 screws).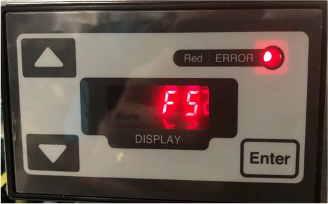
After a component is replaced or the inspection is completed, cycle power to the unit several times to confirm the error does not re-occur.
Below is the list of the error codes. If the corrective action does not solve the error problem, a malfunction of the PCB valve is highly likely.Error
code
Reason for the error
Corrective action
H9
HP ambient(outdoor)
temperature thermistor error
Check the thermistor connectors on the main PCB or control PCB in the heat pump unit for any disconnection, fall-off, wire breakage or short circuit.
Measure resistance of the thermistor indicated by the error code.
HC
HPwater outlet (outgoing)
temperature thermistor error
J3
HP discharge temperature
thermistor error
J5
HP suctiontemperature
thermistor error
J6
HP defrosttemperature
thermistor error
J8
HPwater inlet (return)
temperature thermistor error
H7
Tank temperature thermistor error
- Check the thermistor cable on the terminal block in the heat pump unit for any disconnection, fall-off, wire breakage or short circuit.
- Measure resistance of the thermistor indicated by the error code.
E6
Compressor bootingerror
- Check the compressor connector.
- Replace the main PCB or heat pump.
H6
Compressor revolution error
- Check the supply voltage.
- Measure resistance of each thermistor.
- Measure resistance of coil of expansion valve to check open or short circuit.
Error
code
Reason for the error
Corrective action
Replace the PCB or heat pump.
U0
Refrigerant leakageerror
- Measure resistance of each thermistor.
- Measure resistance of coil of expansion valve to check open or short circuit.
- Replace the main PCB or heat pump.
E1
Main PCB error
Replace the control PCB.
E2
L7
Control PCB error
Replace the control PCB.
F5
Communication error between main PCB to control PCB
- Check the communication connector on the main PCB and control PCB.
- Replace the main PCB or control PCB.
E8
High inlet current error
- Check the installation location.
- Check the supply voltage.
- Replace the main PCB or heat pump.
H8
Current error
Replace the main PCB.
L4
High temperature of module error
- Check the installation location.
- Remove foreign objects from the evaporator coil (e.g. fallen leaves, grass, snow).
- Check the fan motor is not flowing by dirt.
- Replace the main PCB or fan motor.
L5
High outlet current error
- Measure resistance of the discharged thermistor.
- Measure resistance of coil of expansion valve to check open or short circuit.
- Replace the main PCB or heat pump.
P4
Module temperature
thermistor error
Replace the main PCB.
U2
High voltage error
Check the supply voltage.
HJ
Water circuit error
- Check the inlet water valve.
- Check for any piping bend, blockage, kink or frozen.
- Measure resistance of each thermistor.
- Measure resistance of coil of expansion valve to check open or short circuit.
- Replace the main PCB or heat pump.
EC
High water outlet error
- Check the water circuit is not flowing by air, dirt or scaling.
- If the water circulation pump is not working, replace the pump.
- Measure resistance of water outlet (outgoing) thermistor.
- Replace the main PCB.
E9
Water circulation pump error
- Check the water is full in the tank.
- If the water circulation pump is not working, replace the pump.
- Check the revolution of pump by controller. If the revolution is low, replace the pump.
- Replace the main PCB.
Error
code
Reason for the error
Corrective action
E7
Fan motor locked
- Remove foreign objects around the fan motor.
- Check the fan motor connectors on the main PCB.
- Replace the main PCB.
F3
Discharged temperature error
- Measure resistance of the discharged thermistor.
- Replace the main PCB or heat pump.
Error
code
Reason for the error
Corrective action
H9
HP ambient(outdoor)
temperature thermistor error
Check the thermistor connectors on the main PCB or control PCB in the heat pump unit for any disconnection, fall-off, wire breakage or short circuit.
Measure resistance of the thermistor indicated by the error code.
HC
HPwater outlet (outgoing)
temperature thermistor error
J3
HP discharge temperature
thermistor error
J5
HP suctiontemperature
thermistor error
J6
HP defrosttemperature
thermistor error
J8
HPwater inlet (return)
temperature thermistor error
H7
Tank temperature thermistor error
- Check the thermistor cable on the terminal block in the heat pump unit for any disconnection, fall-off, wire breakage or short circuit.
- Measure resistance of the thermistor indicated by the error code.
E6
Compressor bootingerror
- Check the compressor connector.
- Replace the main PCB or heat pump.
H6
Compressor revolution error
- Check the supply voltage.
- Measure resistance of each thermistor.
- Measure resistance of coil of expansion valve to check open or short circuit.
Error
code
Reason for the error
Corrective action
Replace the PCB or heat pump.
U0
Refrigerant leakageerror
- Measure resistance of each thermistor.
- Measure resistance of coil of expansion valve to check open or short circuit.
- Replace the main PCB or heat pump.
E1
Main PCB error
Replace the main PCB.
E2
L7
Control PCB error
Replace the control PCB.
F5
Communication error between main PCB to control PCB
- Check the communication connector on the main PCB and control PCB.
- Replace the main PCB or control PCB.
E8
High inlet current error
- Check the installation location.
- Check the supply voltage.
- Replace the main PCB or heat pump.
H8
Current error
Replace the main PCB.
L4
High temperature of module error
- Check the installation location.
- Remove foreign objects from the evaporator coil (e.g. fallen leaves, grass, snow).
- Check the fan motor is not flowing by dirt.
- Replace the main PCB or fan motor.
L5
High outlet current error
- Measure resistance of the discharged thermistor.
- Measure resistance of coil of expansion valve to check open or short circuit.
- Replace the main PCB or heat pump.
P4
Module temperature
thermistor error
Replace the main PCB.
U2
High voltage error
Check the supply voltage.
HJ
Water circuit error
- Check the inlet water valve.
- Check for any piping bend, blockage, kink or frozen.
- Measure resistance of each thermistor.
- Measure resistance of coil of expansion valve to check open or short circuit.
- Replace the main PCB or heat pump.
EC
High water outlet error
- Check the water circuit is not flowing by air, dirt or scaling.
- If the water circulation pump is not working, replace the pump.
- Measure resistance of water outlet (outgoing) thermistor.
- Replace the main PCB.
E9
Water circulation pump error
- Check the water is full in the tank.
- If the water circulation pump is not working, replace the pump.
- Check the revolution of pump by controller. If the revolution is low, replace the pump.
- Replace the main PCB.
Error
code
Reason for the error
Corrective action
E7
Fan motor locked
- Remove foreign objects around the fan motor.
- Check the fan motor connectors on the main PCB.
- Replace the main PCB.
F3
Discharged temperature error
- Measure resistance of the discharged thermistor.
- Replace the main PCB or heat pump.
-
Is water quality an important consideration for the Sanden Eco® Plus heat pump hot water system?
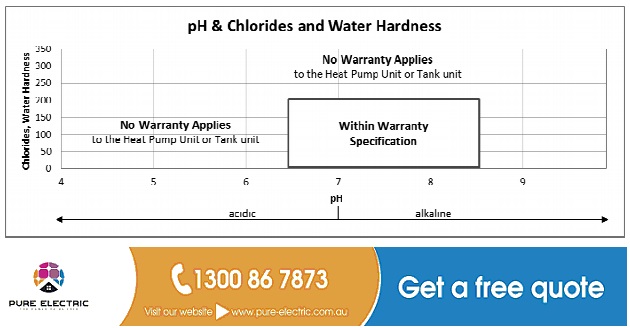
Yes, importantly no warranty applies to the heat pump unit and the storage tank, where the chloride level exceeds 200 mg/litre and the pH is less than 6.0. If in doubt, seek water quality information from your local council or water supplier.
-
What is the noise level of the Sanden Eco® Plus heat pump hot water system?
The unit is rated at 37dB (measured at one metre from the unit), which is almost silent. By comparison, a whisper is around 30dB and the sound of the inside of a Library is approximately 40dB.
- A high Coefficient of Performance (COP=5.96^) results in significantly reduced energy use and CO2 emissions.
- Up to 50% faster heat recovery than typical heat pumps. In ambient air of 20 ºC it takes approx 4 hours to heat 315 L of water from 17 ºC to 63 ºC.
- Uses unique Ozone friendly R744 (CO2) refrigerant.
- Simple installation by Plumber & Electrician, with no Refrigeration Mechanic required.
- An automatic heating cycle, which makes it perfect for use with Off-Peak tariff.
- Uniquely designed to operate in all climates (ie. -10 ºC to +42 ºC operating range).
- Includes Blockout Timer, for use with on-roof photo voltaic (PV) solar electricity systems.
- No backup element required.
- Whisper quiet operation, with industry leading noise level of 37 dB - very neighbour friendly!
- High quality, Japanese made weather resistant construction for outdoor location.
- 6 year Warranty
Why use the Eco-friendly R744 (CO2) refrigerant?
- It offers no ozone layer depletion and minimal global warming (ie. as per table below) versus other commonly used refrigerants, should the system leak.
- It performs higher compression efficiency, with lower energy consumption, thereby allowing more heat to be transferred to the water, for less energy used (i.e. excellent thermodynamic ability).
- The refrigerant temperature gets very hot, very quickly, so water temperature of 63ºC, is achieved almost instantly from the Heat Pump unit.
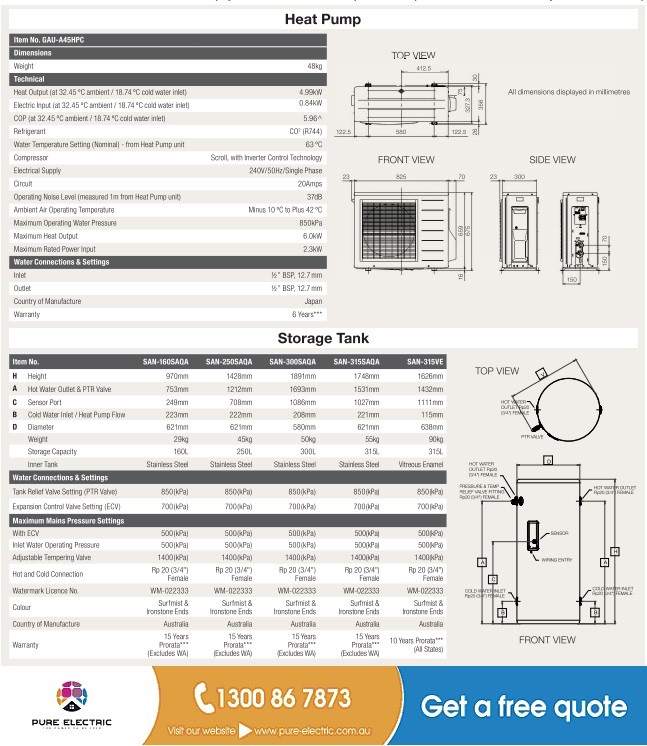
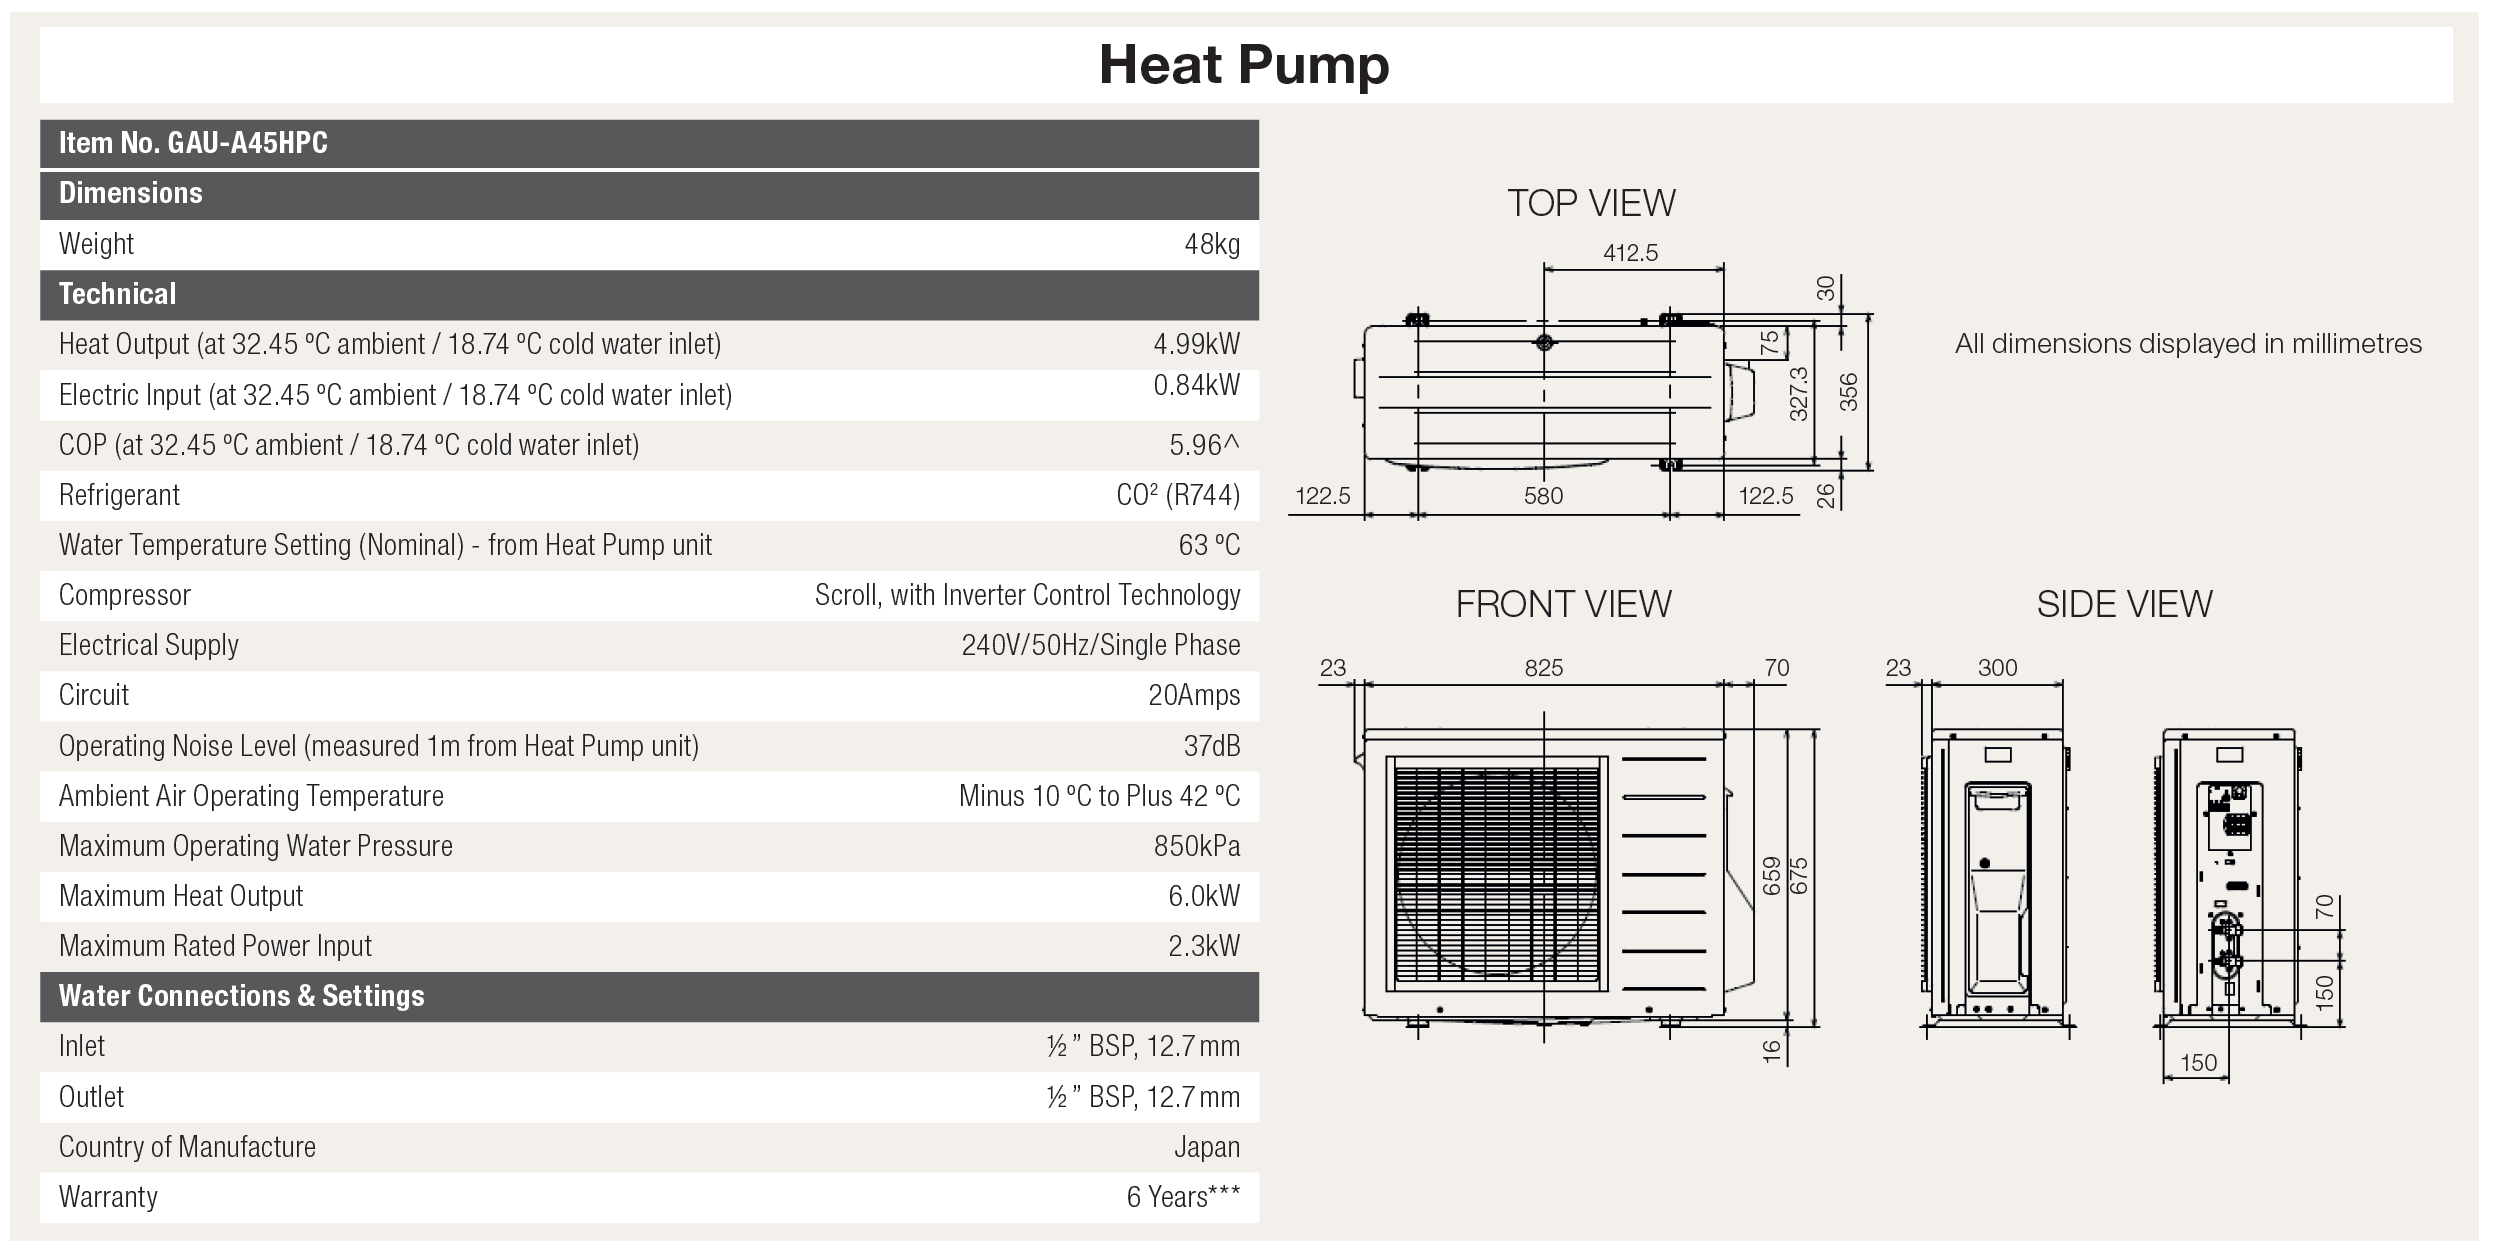
Sanden Heat Pump Unit GAU-A45HPC also known colloquially as the "G4".
Table of Specifications
| Model: | GAU-A45HPC |
| Dimensions | |
| Weight: | 48kg |
| Width: | 895mm |
| Height: | 675mm |
| Depth: | 300mm |
| Technical | |
| Heat Output (at 32.45 ºC ambient / 18.74 ºC cold water inlet) | 4.99kW |
| Power Input (at 32.45 ºC ambient / 18.74 ºC cold water inlet) | 0.9kW |
| COP (at 32.45 ºC ambient / 18.74 ºC cold water inlet) | 5.96^ |
| Refrigerant | CO2 (R744) |
| Water Temperature Setting | 63ºC |
| Compressor | Scroll, with Inverter Control Technology |
| Electrical Supply | 220-240V/50Hz/1Ph |
| Circuit | 20 Amps |
| Operating Noise Level | 37 dB |
| Ambient Air Operating Temperature | -10 ºC to +42 ºC |
| Country of Manufacture | Japan |
| Warranty | 6 Years*** |
| Water Connections and Settings | |
| Inlet | ½ ” BSP, 12.7 mm |
| Outlet | ½ ” BSP, 12.7 mm |
Specifications for Sanden Heat Pump Unit G4 Model
Removing air from the system
- The following steps must be taken to ensure all air is removed from the system. Incorrect removal of air may cause the water temperature to vary.
- Plumb pipes to the tank unit and the heat pump unit.
- Push up the lever on the PTR valve to open, and fill the tank unit with water.
- Confirm that the water comes out of the relief valve and then close the lever.
- Open the hot water taps in the home to remove air.
Close the hot water taps in the home after no air is confirmed in the water. - Open the water drain plug on the heat pump unit.
- Close the plug after no air is confirmed in the water.
- Connect the power to the heat pump unit.
- Air removing process (Refer to figure 13)
1. Switching to Air Removing Mode
Long press the “Up” and “Down” keys to switch to the “Heat Setting Mode”.
2. Press the “Up” or “Down” keys to switch to the “Air Removing Mode” and press
the “Enter” key. Press the “Up” keys again to display “On”, then press the “Enter”
key. - It will automatically go back to the clock display mode than 5 minutes.
- Open the hot water taps in the home to remove air.
- Close the hot water taps in the home after no air is confirmed in the water.

