PV-ezRack SolarRoof Isolator Shade Installation Guide
- Code-Compliant Planning and Installation Guide V1.0
- Complying with AS/NZS 5033: 2014 AMDT 2: 2018
#1- Introduction
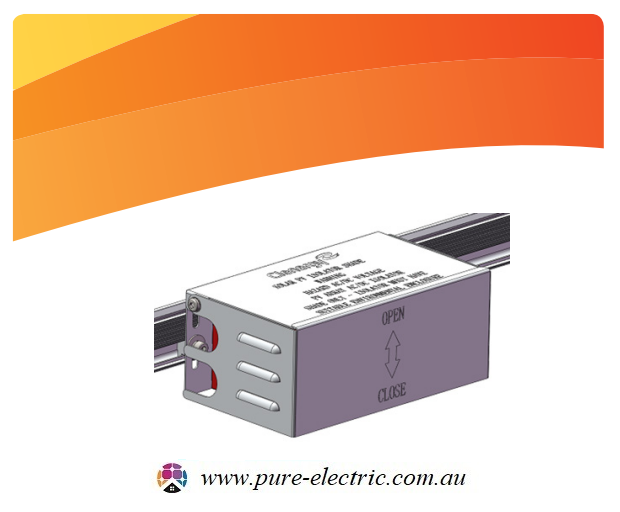
Clenergy PV-ezRack SolarRoof Isolator Shade is an accessory in the PV-ezRack roof-top PVmounting system, suitable for PV array AC/ DC isolators.
Utilising our patented Z-Module technology, the Isolator Shade is easily fixed to the rail and provides earthing continuity through the rail. When correctly installed, the Isolator Shade is designed to function as a shroud to protect isolator and its enclosure from direct exposure to sunlight and rain as required by clause 4.3.3.3.2 of AS/NZS 5033:2014 Amdt 2: 2018.
The isolator must have a suitable enclosure conforming to clause 4.3.3.3.1 of AS/NZS 5033:2014 Amdt 2: 2018. The isolator and its enclosure fit inside the Isolator Shade. Please review this guide thoroughly before installing PV-ezRack SolarRoof Isolator Shade.
The installer is solely responsible for:
- Complying with all applicable local or national building codes, including any that may supersede this manual
- Ensuring that PV-ezRack and other products are appropriate for the particular installation and the installation environment
- Using only PV-ezRack parts and installer- supplied parts as specified by the PV-ezRack project plan. (substitution of parts may void the warranty and invalidate the letter of certification)
- Recycle according to the local relevant statutes
- Removal by reversing the installation process
- Ensure that there are no less than two professionals working on panel installation
- Ensure the installation of related electrical equipment is performed by licenced electricians
- Ensuring safe installation of all electrical aspects of the PV array. This includes adequate earth bonding of the PV array and PV-ezRack® components as required in AS/NZS 5033-2014 AMDT 2 2-2018.
#2-Tools & Components
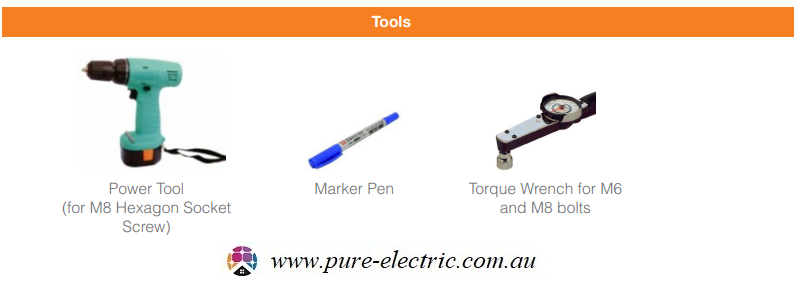
2.1 Tools
- Power Tool (for M8 Hexagon Socket Screw)
- Marker Pen
- Torque Wrench for M6 and M8 bolts
2.2 Components
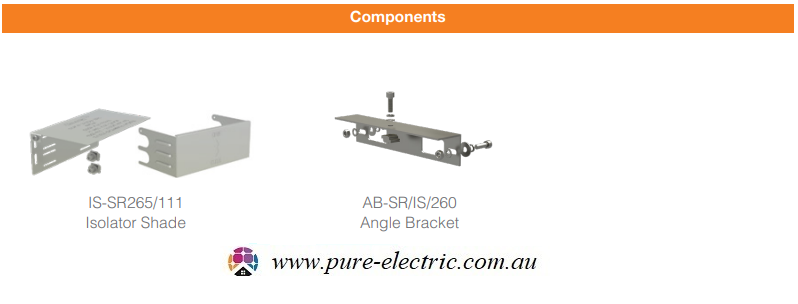
- IS-SR265/111 Isolator Shade
- AB-SR/IS/260 Angle Bracket
Note: Angle Bracket is an optional component when fixing the Isolator Shade at the end of rail.
#3- System Overview
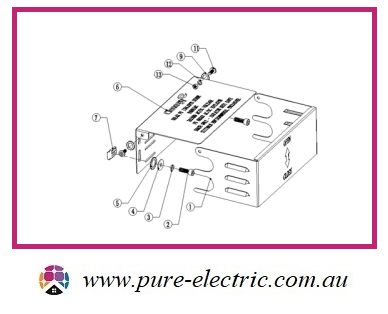
3.1 Overview of Isolator Shade
- To be Fixed Along the Rail
a) Isolator Shade (mill finish)
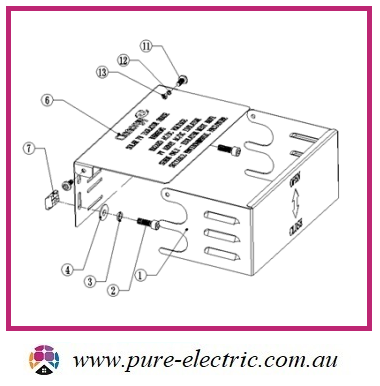
| Item | Part Name | Spec.(mm) |
| 1 | Isolator Cover, 280*155.5*114mm | 280*155.5*114 |
| 2 | Hexagon socket head cap screw M8*25 | M8*25 |
| 3 | Washer 8 | 8 |
| 4 | Plain washer large 8*24 | 8*24 |
| 5 | External Teeth Lock Washer 12 | 12 |
| 6 | Isolator Bracket, 265*155*111.5mm | 265*155*111.5 |
| 7 | Z Module( grounding) | L20 |
| 11 | Hexagon socket head cap screw M6*14 | M6*14 |
| 12 | Washer 6 | 6 |
| 13 | Hexagon nut M6 | M6 |
b) Isolator Shade (black anodized)
Note: For the Isolator Shade (black anodized), lock washers (no. 5 in the image above) are required to achieve earthing continuity.
- To be Fixed at Rail End
a) Isolator Shade (mill finish)
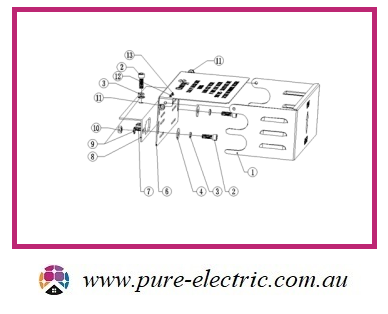
| Item | Part Name | Spec.(mm) |
| 1 | Isolator Cover, 280*155.5*114mm | 280*155.5*114 |
| 2 | Hexagon socket head cap screw M8*25 | M8*25 |
| 3 | Washer 8 | 8 |
| 4 | Plain washer large 8*24 | 8*24 |
| 5 | External Teeth Lock Washer 12 | 12 |
| 6 | Isolator Bracket, 265*155*111.5mm | 265*155*111.5 |
| 7 | Z Module( grounding) | L20 |
| 8 | Angle Bracket for Isolator Shade, 260 mm Length | Length 260*50.8*2.8 |
| 9 | External Teeth Lock Washer 8 | 8 |
| 10 | Hexagon nut M8 | M8 |
| 11 | Hexagon socket head cap screw M6*14 | M6*14 |
| 12 | Washer 6 | 6 |
| 13 | Hexagon nut M6 | M6 |
b) Isolator Shade (black anodized)
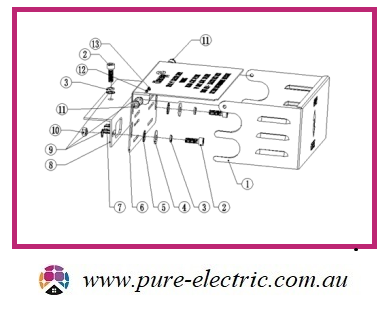
Note: For the Isolator Shade (black anodized), lock washers (no. 5 in the image above) are required to achieve earthing continuity.
3.2 Precautions During Stainless Steel Fastener Installation
Improper operation may lead to deadlock of Nuts and Bolts. The steps below should be applied to every stainless steel nut and bolt assembly to reduce this risk.
3.2.1 Reduce the friction coefficient:
1 Ensure that the thread surface is clean (no dirt or contaminant;
2 Apply lubricant (grease or 40# engine oil) to fasteners prior to tightening to avoid galling or seizing of threads;
3.2.2 General installation instructions:
1 Apply force to fasteners in the direction of thread;
2 Apply force uniformly, to maintain the required torque;
3 Professional tools and tool belts are recommended;
4 Avoid using electric tools for final tightening;
5 Avoid working at high temperatures.
3.2.3 Safe Torques
Please refer to safe torques defined in this guide.
#4- Installation Instruction
4.1 To be Fixed Along the Rail
4.1.1
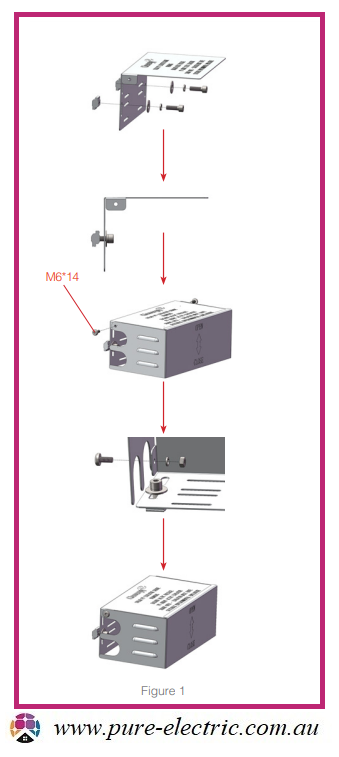
- According to your plan, assemble the Isolator Shade step by step as shown in Figure 1.
- Recommended torque for M6 bolts is 4-5 N·m, which allows for optimal opening and closing of the isolator cover.
4.1.2
According to your plan, mark out the position for Isolator Shade installation on the Rail.
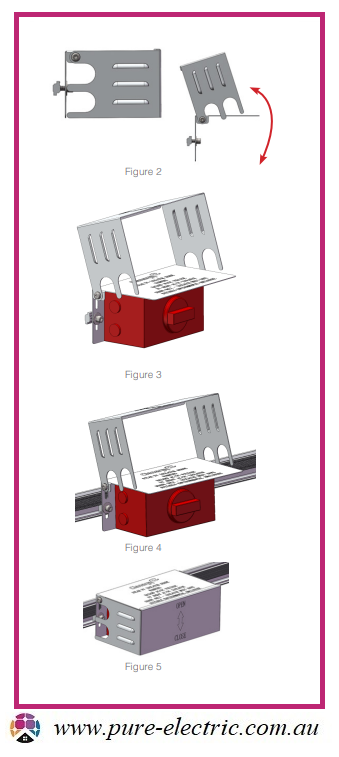
Note: Allow space above the Rail for the Isolator Shade Cover to open fully (Figure 2).
4.1.3
Rotate up the Cover and fix the Isolator to the Isolator Shade according to the Isolator Installation Guide (Figure 3).
4.1.4
Once the Isolator is fixed properly, position the Z Module in the Rail channel and fix the Isolator Shade with the bolts supplied (Figure 4).
Recommended torque for M8 bolts is 4-5 Nm.
4.1.5
After cable installation, close the Isolator Cover (Figure 5).
4.2 To be Fixed Rail End (Optional)
4.2.1
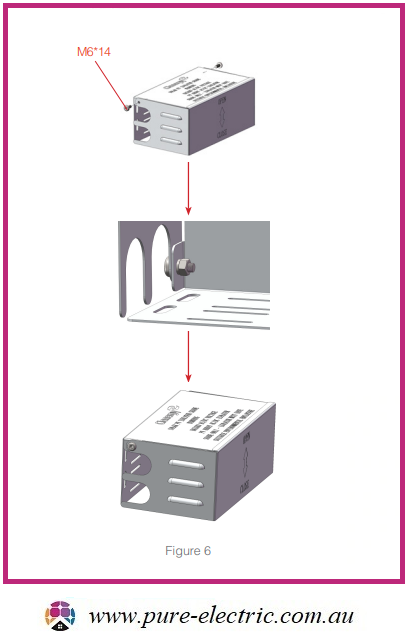
According to your plan, assemble the Isolator Shade step by step as shown in Figure 6.
Recommended torque for M6 bolts is 4-5N·m, which allows for optimal opening and closing of the isolator cover.
Note: When using Isolator Shade (black anodized), please apply External Teeth Lock Washers between Plain washer and Isolator Bracket as highlighted in 3.1 (Overview of Isolator Shade).
4.2.2
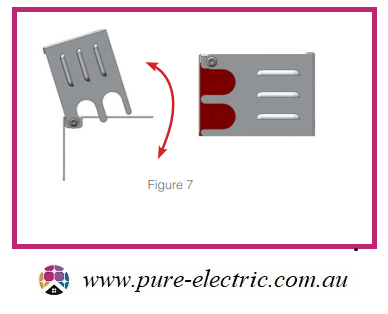
Rotate up the Cover and fix the Isolator to the Isolator Shade according to the Isolator Installation Guide as shown in the Figure 7.
4.2.3
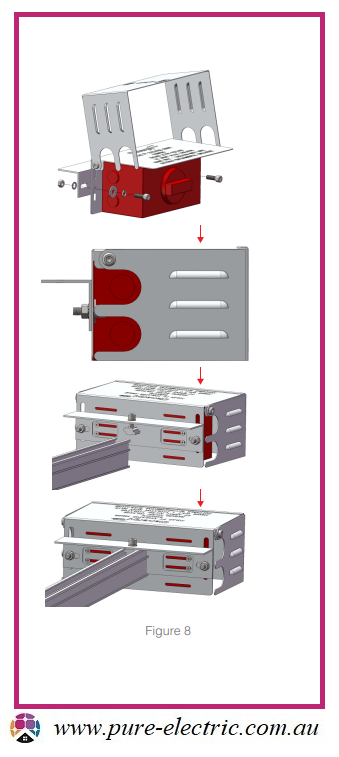
Fix the Angle Bracket to the Isolator Shade and then fix the assembled Isolator Shade on the Rail as shown in the Figure 8.
Note: Allow space above the Rail for the Isolator Shade Cover to open fully (Figure 2).
Recommended torque for M8 Bolts for fixing Angle Bracket on Isolator Shade is 8-10 N·m.
Recommended torque for M8 Bolt for fixing Isolator Shade on the Rail is 16-20 N·m
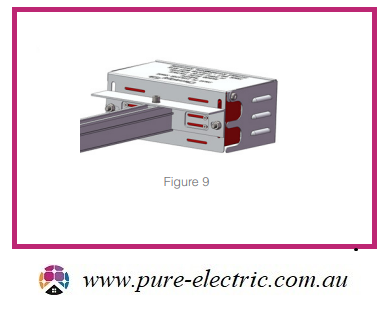
4.2.4
After cable installation, close the Isolator Cover as shown in the Figure 9.