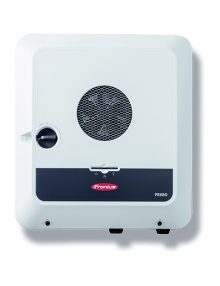
Fronius Primo GEN24 6.0kW Inverter
GET A FREE QUOTE
QUICK REVIEW
Designed to empower.
Sustainable, reliable, future-proof: With our Fronius GEN24 inverter as the core of a PV system, you can produce your own energy flexibly and cheaply. The Fronius GEN24 Plus hybrid inverter even enables the connection of a battery storage system so that you can use the solar energy you produce for electricity, heating, cooling and e-mobility. Full solar power for your personal energy revolution with the Fronius GEN24 and Fronius GEN24 Plus.
Designed to empower.
Model: Primo GEN24 6.0 (AS4777-2 2020)
Fronius Primo GEN24 6.0kW Inverter
Maximum flexibility
With the Fronius GEN24 or Fronius GEN24 Plus as the core of your PV system, you will not only be starting your own energy revolution, you will also gain access to all the possibilities and advantages of solar energy. With “Fronius UP”, your PV system becomes even more flexible. A software update turns the Fronius GEN24 into our Fronius GEN24 Plus hybrid inverter.
Backup power for every situation
Reliable energy supply: The Fronius GEN24 offers with “PV Point” an integrated basic backup power function. With the Fronius GEN24 Plus, you can choose “PV Point" or, with “Full Backup” *, a backup power supply for the entire household.
Built-in freedom
The Fronius GEN24 and Fronius GEN24 Plus have open interfaces. This means third-party components can be easily integrated in the system – for a customised PV system.
Easy to install
Saves time and money: Quick and reliable installation with 180° quick release screws, push-in tension clamp terminals and a well thought-out wall mounting system.
Support & tools
Endless support: Efficient Fronius solutions are available free of charge to help with planning, installation and system monitoring. This increases customer satisfaction and minimises maintenance expense.
Testimonials
What they are saying about us
F.A.Q
Frequently Asked Questions
-
How do I connect my Fronius GEN24 Inverter to WiFi? (No WPS Option)
Need help setting up WiFi for your Fronius GEN24 Inverter to your Fronius Solar.web monitoring? This method is if you don't have a WPS button on your modem. The WPS method is faster (if available) and we have a separate page for that.
Have you recently changed your WiFi network's password, WiFi modem, internet service provider or shifted to NBN? If so, you will need to update your WiFi password settings otherwise you will not be able to view your Fronius solar PV system online in the Fronius Solar.web monitoring portal and might recieve an email to your registered Fronius Solar.web accounts reportin fault 996 - communicatoin error between inverter and Solar.web.
Below are steps for how to set up / change your WiFi details.
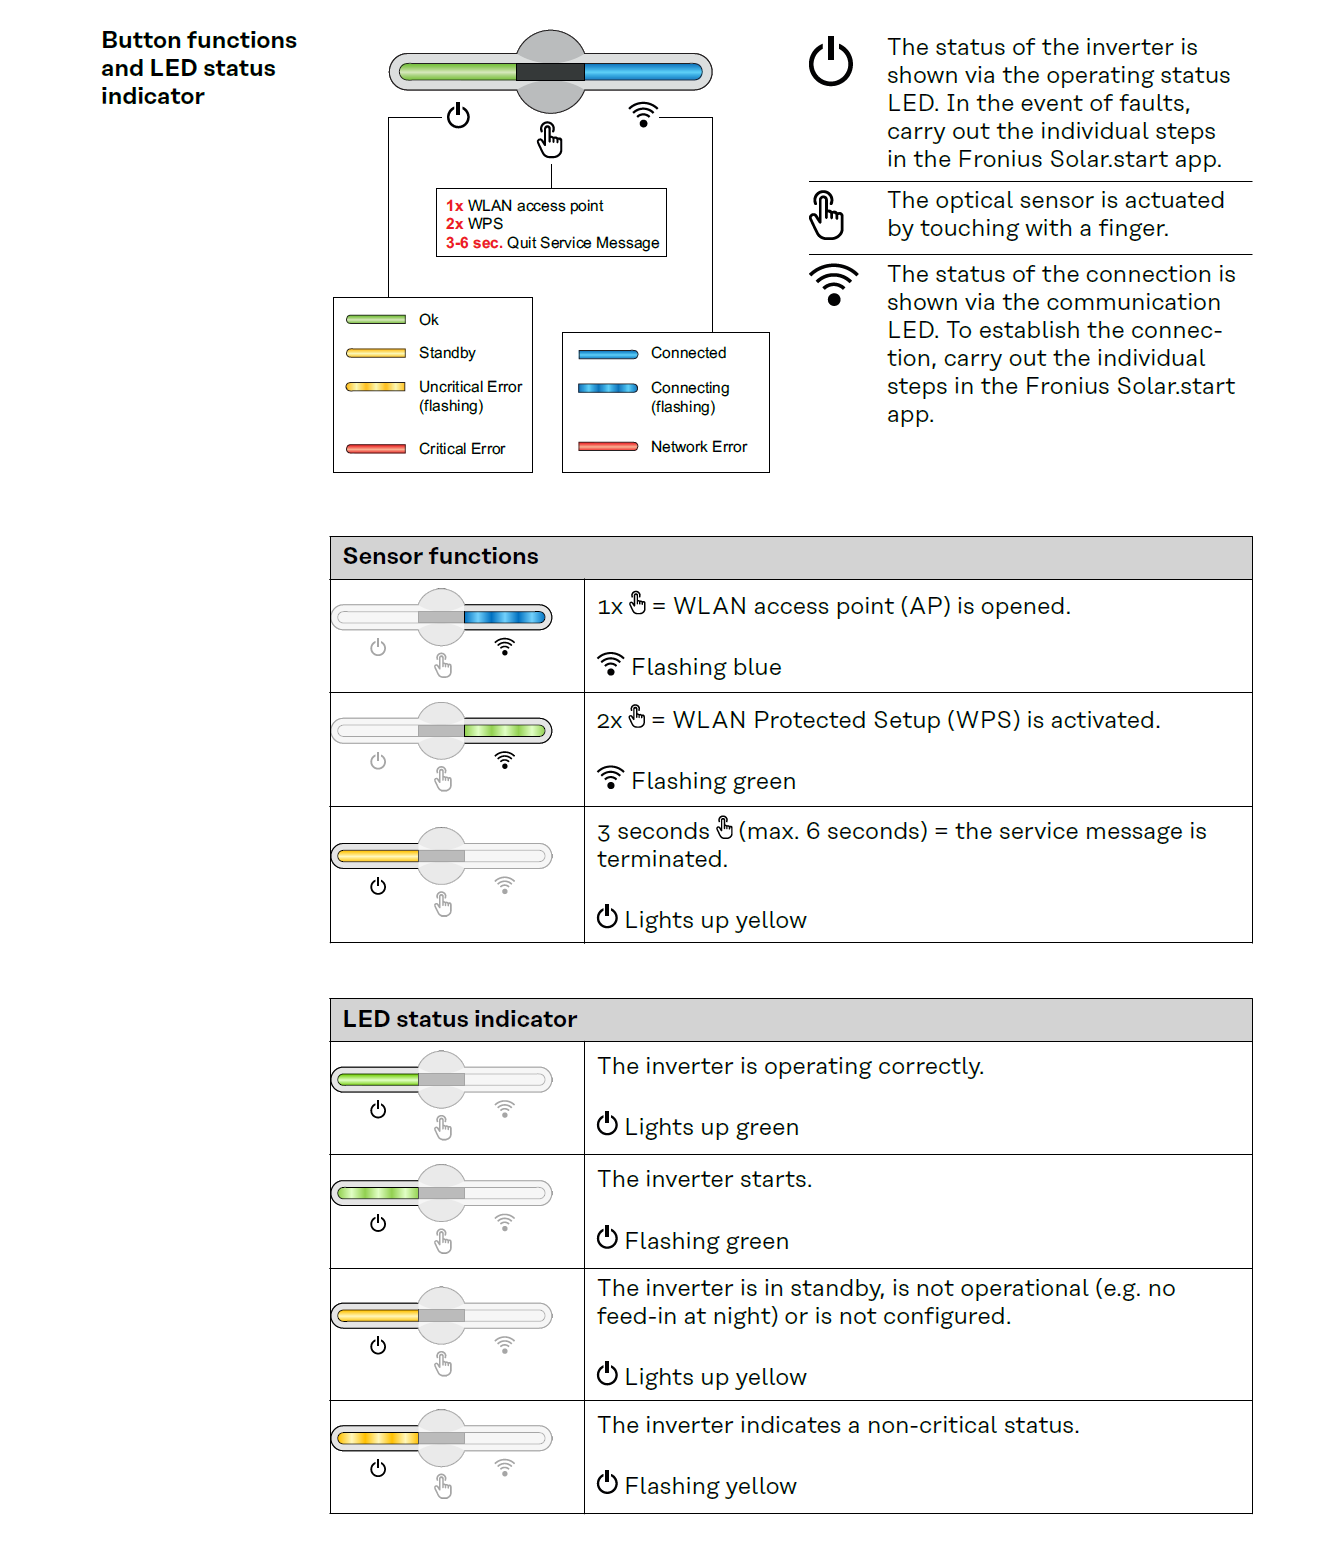
Step 1 - Activate WiFi Access Point on the Fronius GEN24
- Go the Fronius GEN24 Inverter and place your finger over the Optical Button where it shows the Finger icon - only briefly tap your finger ONCE before removing it.
- Just to the right you'll see a blue flashing light - this indicates the WiFi Access Point has been initiated
Step 2 - Connect Fronius GEN24 to your Smart Device (e.g. Tablet / Phone)
- Go to your Smart Device (e.g. Tablet / Phone) - click WiFi and look up and select the Fronius WiFi Access Point - this will look something like "FRONIUS_XXXXXXXX" (the Serial Number of the Inverter) so you can connect to the inverter
- Enter the Password: 12345678 and now your Smart Device should be connected to the Fronius inverter
Step 3 - Connect Fronius GEN24 Inverter to your Home WiFi Network
- Open up a webpage on your browser and enter the IP address: 192.168.250.181
- Now the Fronius GEN24 inverter page should show up showing your Production and Consumption bubbles.
- Click the Top Right corner of the screen which shows the three lines, otherwise known as the 'Hamburger' icon
- Now select, "Communications"
- Log-in as "Customer" User and enter your Password and click "Login". The screen should revert back to the Production and Consumption bubbles
- Click the three lines in the top right corner again, the 'Hamburger' icon and click "NETWORK"
- Now scroll down to Wifi, click your WiFi Network
- Enter your WiFi Home Network Password and press DONE
Step 4 - Check that the settings are saved
- Go back to solarweb.com to your Fronius PV system and you should see that your monitoring is back up and running
-
Connecting Fronius GEN24 Inverter to Wifi - Fastest Method
Need help setting up WiFi for your Fronius GEN24 Inverter to your Fronius Solar.web monitoring? This method is if you have a WPS button on your modem. The WPS method is the fastest, we have a separate FAQ page to re-connect your WiFi if you don't have a WPS button in a separate FAQ explainer.
Have you recently changed your WiFi network's password, WiFi modem, internet service provider or shifted to NBN?
If so, you will need to update your WiFi password settings otherwise you will not be able to view your Fronius solar PV system online in the Fronius Solar.web monitoring portal and might recieve an email to your registered Fronius Solar.web accounts reporting fault 996 - communication error between inverter and Solar.web.
Below are steps for how to set up / change your WiFi details.
Step 1 - Activate WPS on your Modem/Router
- Go to your Modem/Router and locate the WPS button which is typically on the back of the modem/router
- Click and hold the "WPS" button for approximately 3 seconds
Step 2 - Activate WPS on the Fronius GEN24 Inverter
- Go to the Fronius GEN24 Inverter, if the WiFi is not connected, you should see solid Red, objective is get this solid Blue.
- Once in front of the inverter you'll see a Finger icon in the middle which is an Optical Sensor. Place your finger over the Optical Sensor and give two slow taps over the Optical Sensor (not too quickly). Place over and remove (first time), place over and remove (second time). If done correctly the WiFi indicator will start flashing GREEN which indicates the Inverter is trying to connect to your WiFi internet
- Wait up to 30 seconds, it will turn solid Red for a few seconds and then it will turn solid Blue. Once solid Blue, your inverter should be connected to the internet
Step 3 - Check your Solar.web monitoring account to confirm monitoring is working
- Go back to solarweb.com to your Fronius PV system and you should see that your monitoring is back up and running
Fronius Primo GEN24 6.0kW Inverter
Fronius Primo GEN24 6.0kW Inverter
Partname: Primo GEN24 6.0 (AS4777-2 2020)
Fronius Primo GEN24 6.0kW Inverter


