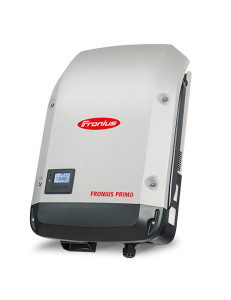
Fronius Primo 8.2kW Inverter
GET A FREE QUOTE
QUICK REVIEW
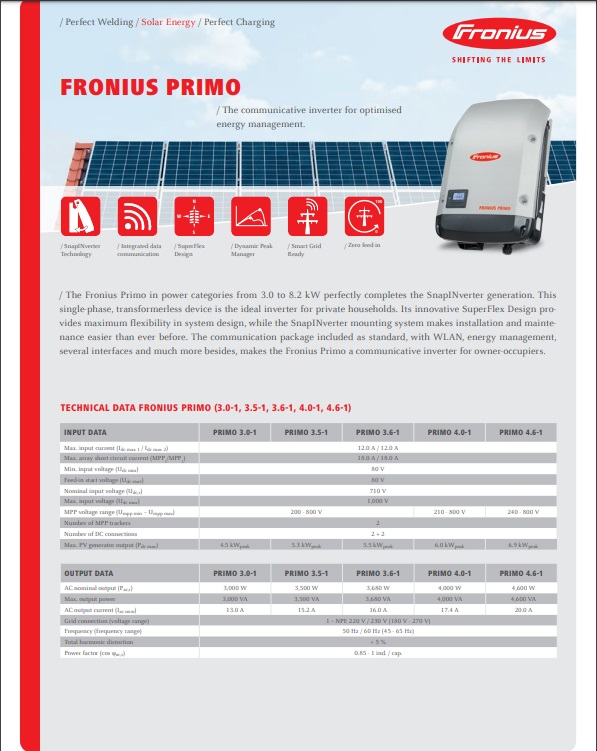
The communicative inverter for optimised energy management.
The Fronius Primo in power categories from 3.0 to 8.2 kW perfectly completes the SnapINverter generation. This single-phase, transformerless device is the ideal inverter for private households.
Its innovative SuperFlex Design provides maximum flexibility in system design, while the SnapINverter mounting system makes installation and maintenance easier than ever before.
The communication package included as standard, with WLAN, energy management, several interfaces and much more besides, makes the Fronius Primo a communicative inverter for owner-occupiers.
Fronius Primo 8.2kW Inverter
The communicative inverter for optimised energy management.
The Fronius Primo in power categories from 3.0 to 8.2 kW perfectly completes the SnapINverter generation. This single-phase, transformerless device is the ideal inverter for private households.
Its innovative SuperFlex Design provides maximum flexibility in system design, while the SnapINverter mounting system makes installation and maintenance easier than ever before.
The communication package included as standard, with WLAN, energy management, several interfaces and much more besides, makes the Fronius Primo a communicative inverter for owner-occupiers.
Testimonials
What they are saying about us
F.A.Q
Frequently Asked Questions
-
How do I connect my Fronius SnapINverter to Wifi?
Need help setting up WiFi for your Fronius SnapINverter (Fronius Primo / Fronius Symo) to your Fronius Solar.web monitoring?
Have you recently changed your WiFi network's password, WiFi modem, internet service provider or shifted to NBN? If so, you will need to update your WiFi password settings otherwise you will not be able to view your Fronius solar PV system online in the Fronius Solar.web monitoring portal and might recieve an email to your registered Fronius Solar.web accounts reporting fault 996 - communicatoin error between inverter and Solar.web.
Below are steps for how to set up / change your WiFi details.
Step 1 - Activate WiFi Access Point
- Go the Fronius SnapINverter front screen, scroll until you see the "SETUP" sub menu - this will look like a spanner and a screwdriver and press ENTER (fourth button on the right)
- Scroll down to the second menu option, "WiFi Access Point", press ENTER (fourth button on the right)
Step 2 - Connect Fronius SnapINverter to your Smart Device (e.g. Tablet / Phone)
- Go to your Smart Device (e.g. Tablet / Phone) - click WiFi and look up and select the Fronius WiFi Access Point - this will look something like "FRONIUS_240.XXXX" so you can connect to the inverter
- Enter the Password: 12345678 and now your Smart Device should be connected to the Fronius inverter
Step 3 - Connect Fronius SnapINverter to your Home WiFi Network
- Open up a webpage on your browser and enter the IP address: 192.168.250.181
- Click the 'Settings' cog
- Now the Fronius inverter page should show up. On the left hand side of the page you'll see various tabs. To change the WiFi settings go to the NETWORK tab.
- Go to WLAN Settings, select your WiFi network and click SET
- Enter your WiFi Home Network Password and press SAVE
- On the button below the list of WiFi Networks - Press CONFIGURE WLAN IP and check that it is set to Dynamic. If so Press Ok
- At the top press the TICK Button to Save
Step 4 - Check that the settings are saved
- Activate the WiFi Access Point and connect your inverter to the Smart Device (as per steps aboe)
- When you see the Fronius inverter settings screen - click "SYSTEM INFORMATION"
- Look for LED states and check that the Globe symbol is GREEN
-
How to set "Night Mode" for Solar PV System with Fronius SnapINverter?
For your solar PV monitoring - Fronius SnapINverter - you can utilise the "Night Mode" setting if you would like to observe your load data when the solar PV system is turned off overnight.
Go to the Fronius inverter and do the following:
+ Step 1: Push the Left/Right button until you see "SETUP" (the symbol looks like a spanner cross with a screwdriver) and press ENTER (physical button furthest to the right)
+ Step 2: Scroll down until you see, "Display Settings", press ENTER
+ Step 3: Scroll once down again to, "Night Mode", press ENTER
+ Step 4: Click the + or - buttons to switch the "Night Mode" setup parameter to "ON", press ENTER
And now you should see your overnight usage will be displayed in your Fronius Solar.web account.
-
How to Update Fronius SnapINverter Datamanager and Firmware
For your Fronius SnapINverter (Fronius Primo / Symo) - here we recommend having the most up to date firmware so you get the best out of your rooftop solar PV system with your Fronius SnapINverter.
We recommend setting up regular Calendar reminders to review the current system firmware settings - a recommended interval for checking is annually every 12 months.
IMPORTANT: Ensure the Datamanger is updated BEFORE the Firmware is updated. Detail below:
1. Log into Fronius Solar.web (www.solarweb.com)
2. Select your solar PV system
3. Click on the Settings tab
4. Click on the Components tab
5. Begin the update process for the Fronius Datamanager. Select the Data Source and click UPDATE (Important! Wait until this is complete before proceeding to the next step)
6. Updating the Fronius SnapINverter firmware by selecting the Inverter and click UPDATE (Note this process can take up to 20-60 minutes for this process to complete.)
Fronius Primo 8.2kW Inverter
Fronius Primo 8.2kW Inverter
Fronius Primo 8.2kW Inverter
